How I made my first, CHEAP, aquarium sump
Sump filtration systems are popular amongst fish hobbyist, but in 33 years of fish keeping I have never had one on my tanks. My filter of choice is the good ‘ole under gravel. It can be a hotly debated method, but it has always served me well. Of course I have lived in places with good water straight out of the tap! Currently I am living in a real estate rehab house, and the water quality here is awful for fish. There are wild fluctuations in chemical composition, sometimes the chlorine is overwhelming. I do not trust it, and it has made keeping my tank level a chore.
As much as I like under gravel filters, I recognize their strengths and weaknesses- one weakness being the (slow) speed at which they can process the water. Larger established tanks can absorb spikes ok, but my little 30 gallon struggles under the load…. enter the sump filter.
Sumps can process the entirety of the tank’s water several times per hour, but they tend to be expensive if purchased from a fish store. When you break down their components, it turns out sumps are relatively inexpensive to build yourself.
Here are the major components:
- Method of getting water out of the tank automatically
- Filtration method to run the removed water through
- Method of getting the water back into the tank
That’s it!
“But wait!”, you say, “It cannot be that easy!”
Really, the most difficult part of the project is getting the water out and back into the tank. I promise! The sump itself is simple. It consists of three parts:
- Mechanical filtration
- Biological filtration
- Reservoir of cleaned water
Here is the big picture of my setup:
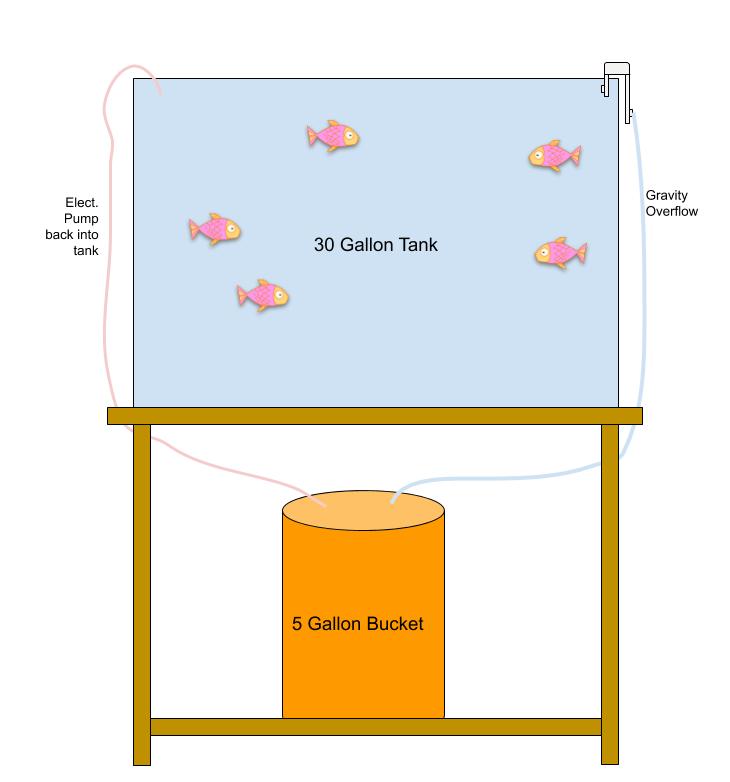
Getting water out of the tank utilizes a siphon and gravity- no electricity required. Just like the gravel vacuum you use when cleaning your tank. The water return is accomplished via an electric pump in the water reservoir, in this case, at the bottom of a 5 gallon bucket.
A cut away view of my sump looks like:

* The circles with an X in them are the biological filtration.
How does this work?
- Water comes into the bucket
- Then it is mechanically filtered via a layer of polyester
- It tickles through the polyester into several layers of plastic pot scrubbies (yes, that you clean pans with!) that act as the biological filtration media. Bacteria loves to grow on this stuff!
- Then falls into an empty space at the bottom of the buckets, the reservoir
- Finally, an electric pump pumps it back into the tank
All told, this system cost less than $60 to build, vs hundreds to purchase from a pet store.
Here is a list of the components I used:
- $3.25 – Home Depot 5 gallon bucket.
- $7.99 – 24 assorted pot scrubbies. The price went from $7 to $12 during the build! This 18 pack of pot scrubbies is a much better value now.
- $10.89 – Pond filtration. This is the polyester material. This is essentially the same as what you could get from a sewing shop.
- $8.99 – Plastic grid used to separate the reservoir from the filtration media.
- $16.99 – Submersible water pump.
- $10 – Misc bits of pvc pipe and fittings.
I put a ball valve on the water return line to be able to control the flow rate of water. I believe 250 – 300 gallons per hour is the current flow rate through this system. That means the entire tank water gets processed up to 10 times per hour! That is a lot of filtration….maybe a little overkill. Recommendations I saw around the web were around 5 times per hour as a minimum.
Overall a very simple project. The water clarity is outstanding and the fish are moving around happily. The main caveat here is that since this is a brand new sump it means it has to go through the whole cycling process. I am hoping it will be accelerated though since the tank as it was was cycled already. Some of that good bacteria should make its way into the sump to help prime it.
Have you built a sump before? What is your method?
If this post has inspired you to build one please drop a comment below. I would love to hear about your experience.
A couple great resources on the web for all things fish keeping
- Aquarium Co-op– these guys are local to me!
- King of DIY– he can show you how to build anything